n0nx0x2n0nx0x2 - User's Manual
- Introduction
- n0nx0x2 requirements
- x0xb0x overview
- Updating the Firmware
- 1. Sequencer
- 2. At-Boot functions
- 3. Settings Mode
- Patterns
- 4. PATTERN-WRITE mode
- 5. PATTERN-PLAY mode
- Tracks
- 6. TRACK-WRITE mode
- 7. TRACK-PLAY mode
- 8. TRACK-RECORD mode
- 9. MANIPULATE mode
- 10. Pattern-Trigger mode (A)
- 11. FLAT-Edit mode (B)
- 12. MIDIPLAY mode
- 13. Computer Control mode
- 14. Special features
Introduction
![]()
n0nx0x2 is a FirmWare for the x0xb0x bassline synthesizer.
|
Warning
|
n0nx0x2 uses a its own pattern/track format. This means that the patterns/tracks won’t be compatible between n0nx0x2 and the standard adafruit/sokkos2 formats. If you have precious patterns - make a backup! |
|
Note
|
If you’re installing n0nx0x2 for the first time,
you might get some weird behaviour since it loads the settings from the internal eeprom,
and they will probably be random (usually 0xFF).It’s recommended to Reset to default settings. |
|
Note
|
n0nx0x2 does not work on the normal x0xb0x MCU (atmega162). It requires an MCU upgrade modification. |
n0nx0x2 requirements
|
Note
|
A standard x0xb0x will not run n0nx0x2. |
-
x0xb0x
Preferably a standard x0xb0x with a DIP-40 socket for the CPU (IC3), and the PACTEC PT-10 enclosure. -
CPU upgrade modification
x0xlarge or an equivalent adapter board, replacing the normal atmega162 with an atmega2561.-
The x0xb00t2 bootloader (preferably x0xb00t2.1)
-
-
n0nx0x2 custom front panel (or an overlay)
x0xb0x overview
|
Note
|
Many of the buttons, selectors, and LEDs, have multiple different labels on the front panel. This manual refers to them accordingly depending on the context. |
| DinSync |
Input or Output (selected via firmware) |
| MIX IN |
analog input to the audio mixer |
| MIDI IN |
- |
| MIDI THRU |
buffers the signal on the input and provides it as an output |
| MIDI OUT |
- |
| OUTPUT |
main analog output from the x0xb0x |
| USB |
When connected to a computer, the x0xb0x appears as a Virtual-Serial-Port device. |
| CV |
Pitch Control Voltage output from the x0xb0x, 1V/Oct |
| GATE |
Gate output from the x0xb0x |
| HEADPHONE |
output |
| AC 9V |
Power Input. |
| Internal EEPROM (part of the MCU) |
|
| External SPI EEPROM (or equivalent) |
|
|
Tip
|
The External EEPROM could be replaced with another compatible non-volatile SPI memory of similar size, for example an SPI FRAM. |
Updating the Firmware
The bootloader is the first thing that executes on the MCU of the x0xb0x
on every power on/reset.
It quickly checks whether the MODE selector is set to BOOTLOAD mode or not.
If it’s not - it boots the firmware.
If it is - it sets up communications and starts waiting for commands over USB (and possibly MIDI).
|
Tip
|
Here is more information about the bootloader and a video demonstrating how the firmware update process looks like with avrdude. It will be more or less the same via SYSEX, just slightly slower. |
To start the bootloader, set the MODE selector to BOOTLOAD mode, then power-on (or reset) the x0xb0x.

Via USB (with avrdude)
-
Set the x0xb0x to BOOTLOAD mode.
-
Switch the x0xb0x power OFF, then ON.
You should see a special LED pattern which indicates that the bootloader is running, and waiting for commands.
-
Invoke avrdude from the terminal:
avrdude -p atmega2561 -c stk500v2 -P COM3 -b 57600 -e -U flash:w:n0nx0x2.00.hex:ihexReplace COM3 there with the actual name of the virtual serial port device, and n0nx0x2.00.hex with the firmware filename.
When flashing has finished, the bootloader should automatically run the firmware.
|
Note
|
The name of the virtual serial port may be:
|
|
Note
|
On Linux you might not have permission to access the USB/Serial ports as a normal user by default. |
Via MIDI SYSEX
-
Set the x0xb0x to BOOTLOAD mode.
-
Switch the x0xb0x power OFF, then ON.
You should see a special LED pattern which indicates that the bootloader is running, and waiting for commands.
-
Use a MIDI Librarian program to send the firmware
.syxfile via MIDI.
When flashing has finished, the bootloader should automatically run the firmware.
1. Sequencer
The modes on the left side of the MODE selector are mostly the same as in the stock firmware.
As shown in the illustration above, four of the modes are supposed to function just like on the TB-303,
so they will not be covered here (not yet at least), except for the differences and/or extra functions.
n0nx0x2 has 8 banks (I to VIII),
each bank has 2 sections (A and B) of 8 slots.
The total number of patterns is still 128.
There are also 16 tracks.
1.1. Numeric LED animation
To display numbers, n0nx0x2 uses LED animation.
It’s used in most places where numbers have to be displayed.
|
Note
|
For Bar numbers in Track mode - see below. |
The animation has 4 "frames". 3 of these frames can be digits, the 4th one is always empty (a pause).

| To display 10, the animation will be |
[-, 1, 0, -] |
| To display 123 |
[1, 2, 3, -] |
While this might require some getting used to, it makes possible to display numbers from 0 to 999.
1.2. Bar number LED animation
This animation is used only in Track mode.
It uses all of the (SELECTOR) LEDs - 0 to 9, 100 and 200.
| To display 10 |
1 will be lit, 0 will blink. |
| To display 123 |
100 and 2 will be lit, 3 will blink. |
| To display 255 |
200 will be lit, 5 will alternate between blink and lit. |
2. At-Boot functions
The following functions should be performed during boot.
n0nx0x will check for these button combos right after the intro LED animation, so hold the buttons in advance.
2.1. Reset to default settings
Hold FUNCTION+CLEAR while n0nx0x is booting.
You will see a visual indication (via the LEDs) that the settings were reset.
| NAME | DEFAULT VALUE |
|---|---|
1 (INTERNAL - master mode) |
|
ON |
|
1 |
|
1 |
|
120 |
|
16 |
|
1 (step position) |
|
Bank LED Display Bar-counter Wrap |
8 |
0 |
|
XSync Speed |
2 (1x) |
1 (Predict) |
|
Shuffle |
0 (Neutral) |
Shuffle min |
-6 (bank LED 10) |
Shuffle max |
+6 (bank LED 7) |
SPI clock frequency |
4MHz |
6 |
|
Shuffled-Clock |
0 (off) |
1 (enabled) |
|
0 (1V = 24) |
2.2. Batteries-Out effect
This function generates random patterns.
Hold RND+CLEAR while n0nx0x is booting.
You will see a visual indication (via the LEDs) that the patterns are being overwritten. This process will take a few seconds to complete.
|
Warning
|
There is no UNDO! All 128 patterns will be overwritten. |
3. Settings Mode
The following settings are stored into the Internal EEPROM (on the MCU itself).
Make sure you’re in SETTINGS mode (mode selector pointing up).
3.1. Clock Sync mode
Hold the TIME MODE button.
The currentl Sync mode will be shown on the (SELECTOR) LEDs:
-
INTERNAL (Master mode)
-
DinSync (Slaved to DinSync, converts to MIDISync)
-
MIDISync (Slaved to MIDISync, converts to DinSync)
-
No sync? (if you see this - just change it)
To change the sync mode press the respective SELECTOR button (1 to 3) and release the TIME MODE button.
|
Note
|
If the (TEMPO) LED blinks, that means there is clock. |
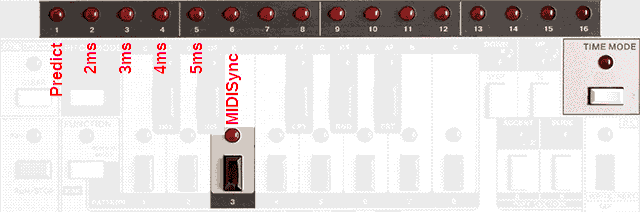
3.1.1. MIDI-to-DinSync Conversion
The Bank LEDs (1 to 5) will display the current setting:
-
Prediction
n0nx0x2 will try to keep the Pulse-Width at 50% -
Fixed-PW: 2ms
-
Fixed-PW: 3ms
-
Fixed-PW: 4ms
-
Fixed-PW: 5ms
Use the TEMPO encoder to change it.
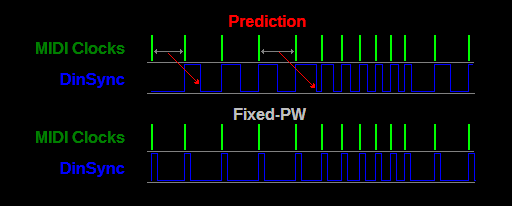
The prediction algorithm is bound to break whenever there are sudden tempo changes from slow to fast between one tick to the next. See why isn’t this a figure?.
-
The master device (sequencer) switches songs and thus the tempo too.
-
The master stops sending clocks at all when not playing (many DAWs do that).
-
Using shuffled MIDI-clock.
In those cases, use the Fixed-PW method.
|
Tip
|
The 4ms setting should be optimal, but be aware that some older DinSync devices might require even higher setting (which on the other hand limits the maximum BPM). |
|
Tip
|
For best sync results: Use a good master clock source (preferably DinSync). |
|
Tip
|
If you must use MIDISync - use a master device which keeps the MIDI_CLOCKs steadily running at all times (as the MIDI specification says), use the Prediction method, and avoid rapid tempo changes. |
3.2. Metronome
It’s possible to mute the metronome (which is used during Tap-Write mode) for example if you have another machine which can serve the purpose of a metronome.
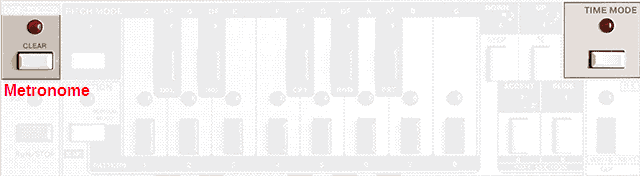
Hold the TIME MODE button.
Press CLEAR to toggle the metronome.
If the (CLEAR) LED is lit - the metronome is enabled.
3.3. Master Wrap
Hold RUN.
The current Master Wrap setting will be shown using the Numeric LED animation.
Dial-in the desired value using the SELECTOR buttons (0 to 9), and release the RUN button.
3.4. Bank LED Display
The (BANK) LEDs can be configured to display:
-
The step position in the pattern
-
A Bar counter (synchronized to the Master)
-
Nothing (Off)
-
The step position in the pattern and a Bar counter (the Bar number is displayed as half-lit)
Hold the STEP button, and press SELECTOR buttons 1 to 4.
|
Note
|
The Bank LED Display is shown in the following modes:
|
|
Tip
|
Option 1 is similar to what the stock firmware does. It could be distracting in some situations. |
|
Tip
|
Option 2 (Bar Counter) can be useful when you want to keep track of the position in the song, while you might be playing irregular patterns or be distracted in other ways. |
|
Tip
|
The Bar Counter uses the same mechanisms as the Master counter and Master-Wrap function,
thus it runs independantly from the x0xb0x sequencer, and is only reset when the Master starts. The actual length of one such "Bar" is the same as in the Master Wrap feature. If this option is selected, there is an additional setting of how many such "Bars" the counter should wrap at, it’s indicated via the (BANK) LEDs, and can be set with the BANK selector (from 2 to 16). |
3.5. MIDI Input Channel
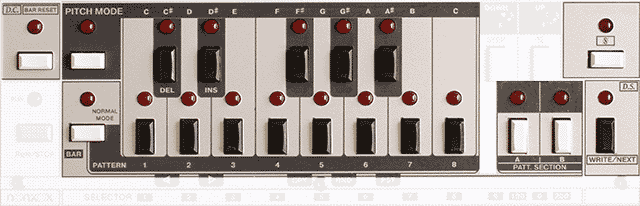
Hold PITCH MODE + INS.
The MIDI-IN channel will be shown on the (BANK) LEDs.
Use the TEMPO encoder to change it.
3.6. MIDI Output Channel
Hold PITCH MODE + DEL.
The MIDI-OUT channel will be shown on the (BANK) LEDs.
Use the TEMPO encoder to change it.
3.7. MIDI-Notes Output
Hold PITCH MODE.
The (STEP) LED indicates whether the MIDI-Notes Output feature is enabled.
Press STEP to toggle it.
3.8. MIDI Note Offset
Hold PITCH MODE, and press FUNCTION.
The Note Offset will be indicated using the (Keyboard) LEDs and (DOWN)/(UP) LEDs.
Use the Key, DOWN, and UP buttons to change it.
Release PITCH MODE when done.
|
Note
|
The neutral setting is when the (low C) LED is lit, and (DOWN)/(UP) are not lit. It equals MIDI Note 24. |
3.9. Tempo

To show the internal tempo (BPM):
Hold the TEMPO button.
The current tempo will be shown using the Numeric LED animation.
To set the tempo:
Hold the TEMPO button.
Dial-in the desired BPM using the SELECTOR buttons (0 to 9), and release the TEMPO button.
3.10. Tempo correction
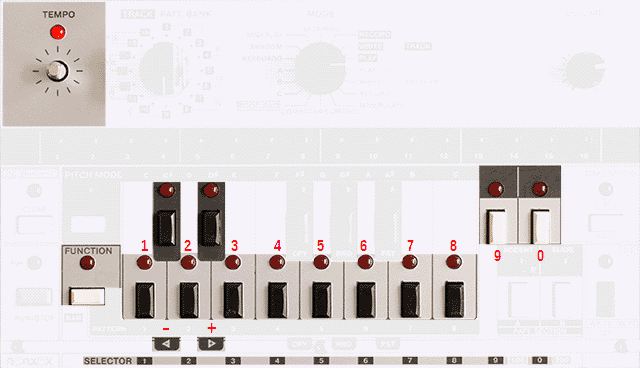
To show the correction setting:
Hold the TEMPO button, press FUNCTION.
The current value will be shown using the Numeric LED animation, and the (DEL(-)) / (INS(+)) LEDs will indicate the negative / positive sign.
To change the correction setting:
Hold the TEMPO button, press FUNCTION.
Dial-in the desired value using the digit buttons (0 to 9).
Use the DEL / INS buttons to set the negative / positive sign.
When finished - release the TEMPO button.
|
Tip
|
More on this here: Tempo Correction guide. |
3.11. XSync (eXtra Sync)
|
Warning
|
Additional protection circuitry may be a good idea here, before hooking the pins to other devices. TODO |
The two signals are only generated while the Sequencer is playing, even if the patterns are empty.
Effectively these are two additional Sync outputs, and you get them also converted (naturally) when the x0x is slaved!
The rate of the two signals can be adjusted from the settings.
|
Note
|
Both share the same setting, for simplicity, but the step-trigger’s rate depends on whether the Sequencer is playing normal (4/4) or triplet (3/4) patterns. |
To display the XSync Clock Rate:
Hold the TIME MODE button, and press NEXT.
The current XSync Clock Rate will be shown on the (SELECTOR) LEDs:
| Setting | Description | PPQN |
|---|---|---|
1 |
2x - double |
8 |
2 |
1x - normal |
4 |
3 |
half |
2 |
4 |
quarter |
1 |
As shown above, if set to 2, the clock will be firing 4 pulses per beat,
while the step-trigger will be outputing 4 or 3 "steps" per beat depending on the pattern.
The step-trigger is a 50:50 pulse
The clock is a fixed-width (5ms) impulse so it should be used as a rising-edge trigger.
To change the XSync Clock Rate:
Use the SELECTOR buttons 1 to 4, and release TIME MODE.
3.12. Shuffle mode
To display the shuffle mode:
Hold the 3/4 (triplet) button and press the TEMPO button.
If the (TIME MODE) LED is lit - the x0xb0x will use shuffled-clock in Master mode, and tick-based shuffle in the Slave modes.
If the (TIME MODE) LED is not lit - the x0xb0x will use tick-based shuffle in all sync modes.
To change the shuffle mode:
Hold the 3/4 (triplet) button and press the TEMPO button.
Press TIME MODE to toggle Shuffled-Clock.
Patterns
- What is a pattern?
-
A pattern stores 16 steps in memory, where each step can either be a valid note (with note Key and DUAS attributes) or a special code.
The special codes can be Rest (the step is off), End-Of-Pattern (EOP), and Triplet.
That’s not really important in practice because you cannot access the data directly in that form.
n0nx0x2 represents the pattern to you as Time and Pitch information, pattern Length and Step Mode, which is rather different than the actual binary format.
Selecting Patterns
To select a pattern:
Press the desired pattern SLOT button (1 to 8).
The selected pattern (SLOT) LED will blink.
When one patterns isn’t enough - you can select multiple patterns (up to 4) from the same Bank and Section.
The patterns must be subsequent within the Section.
To select a chain of patterns:
Hold the SLOT button of the first pattern, and press the SLOT button of the last pattern.
The pattern (SLOT) LEDs of each pattern in the chain will be lit, and the LED of the current pattern will blink.
When the sequencer plays a chain - the patterns are played one after the other.
|
Note
|
Changing the PATT. BANK itself doesn’t actually change the pattern. |
|
Note
|
Changing the PATT. SECTION itself doesn’t actually change the Bank. |
|
Note
|
When the Sequencer is running - the actual pattern change happens at the end of the currently playing chain. |
4. PATTERN-WRITE mode
In this mode, you can write and edit your patterns.
|
Note
|
Selecting patterns in PATTERN WRITE mode is only available while the sequencer is stopped. |
4.1. Pattern CLEAR
|
Note
|
If the sequencer is playing - press STOP to stop it. |
Hold CLEAR and press the pattern SLOT button of the patterns you want to clear.
|
Tip
|
You can clear multiple patterns by holding CLEAR and pressing their SLOT buttons, one by one. |
4.2. Pattern Length and Step Mode
|
Note
|
If the sequencer is playing - press STOP to stop it. |
To see the Pattern Length and Step Mode:
Hold FUNCTION.
The Pattern Length will be displayed on the (BANK) LEDs.
The Step Mode will be indicated on the (3/4) (triplet) LED (lit means 3/4, otherwise 4/4).
To change the Pattern Length:
While holding FUNCTION, press the STEP button N times.
Alternatively, you can also use the INS / DEL buttons or the TEMPO encoder to increment/decrement.
Release the FUNCTION button when done.
This saves the changes to memory.
To change the Step Mode:
While holding FUNCTION, press the 3/4 button.
You can also change the pattern Length here.
Release the FUNCTION button when done.
|
Note
|
In Step Mode 3/4, the pattern Length cannot be more than 15 steps. |
|
Note
|
When changing the Step Mode to 3/4, the pattern Length is automatically set to 12 steps (which is equal to 4 beats). |
|
Note
|
On exit from the submenu (when you release the FUNCTION button), the changes are written to memory, and any steps after the end of the pattern become Rests. |
|
Note
|
If a chain of patterns is selected, the pattern length and step mode is shown for only the first pattern in the chain. |
4.3. PITCH MODE
PITCH MODE is where you access the "notes" or "pitch information" of the pattern.
|
Note
|
If the sequencer is playing - press STOP to stop it. |
To enter PITCH MODE:
Press the PITCH MODE button.
The (PITCH MODE) LED will light up.
To exit PITCH MODE:
Press NORMAL MODE.
|
Note
|
This saves whatever is in the buffer to the memory. |
4.3.1. Writing notes
Repeat for each note:
Press a Key button.
This (over)writes the note at the current position in the pitch buffer (including its DUAS attributes).
The position is auto-advanced when you release the Key button.
|
Tip
|
You can hold any of the DUAS buttons before pressing the Key. |
4.3.2. Stepping through the notes
Hold NEXT.
The note at the current position will be played, its Key will be displayed on the (Keyboard) LEDs,
and the DUAS attributes will be displayed on the (DUAS) LEDs respectively.
You can change the Key and DUAS attributes while still holding the NEXT button.
The position is auto-advanced when you release the NEXT button.
Press BACK to go back to the previous note in the pitch buffer.
4.4. TIME MODE
TIME MODE is where you can access the "time information" of the pattern.
|
Note
|
If the sequencer is playing - press STOP to stop it. |
To enter TIME MODE:
Press TIME MODE.
The (TIME MODE) LED will light up.
To exit TIME MODE:
Press NORMAL MODE.
This saves the pattern(s) to memory.
It’s important to understand what the time values mean and how they affect the pattern:
-
Gate - starts new notes
-
Tie - extends notes
-
Rest is simply a rest.
Each Gate takes a note from the pitch buffer, while Tie and Rest don’t.
Tie can’t "sit" after a Rest.
4.4.1. Writing the time information
For each step in the pattern:
Press the Gate, Tie, or Rest button.
The respective LED will light up.
The position will be auto-advanced when you release the button.
4.4.2. Stepping through the time information
Hold NEXT.
The current step’s time value will be displayed with the
(Gate) / (Time) / (Rest) LEDs.
While still holding NEXT press the respective button to change the time value.
The position will be auto-advanced when you release the NEXT button.
Once you go past the last step of the pattern (or chain) - you will be automatically returned to NORMAL MODE, and thus changes will be written to memory.
|
Tip
|
You can directly go from TIME MODE to PITCH MODE by pressing the PITCH MODE button, which saves one button press. |
|
Tip
|
You can see the whole time information for the current pattern from the chain by holding the SLOT 1 button. The time information will be shown on the (BANK) LEDs:
|
4.4.3. Tap-Write mode
|
Note
|
If the sequencer is stopped - press RUN to start it. |
To activate Tap-Write mode:
Press CLEAR.
The pattern/chain selection is now locked.
The time information of the pattern(s) will be overwritten with Rest values.
The metronome will start (if enabled), and the (CLEAR) LED will blink with it.
The metronome will play a beep twice per beat on patterns with Step-Mode=4/4,
or once per beat on patterns with Step-Mode=3/4.
The very first beep of each pattern will be low-pitched, all others will be high-pitched.
The pattern/chain will continue to cycle untill you complete the cycle.
Wait untill the whole chain cycles around and then start tapping from the first pattern:
Use the TAP button.
Each time you press TAP, a Gate value will be written to the current step.
Holding the TAP button over the following steps will write Tie values to each of them respectively.
All other steps will remain with Rest values.
Once you have began tapping within a cycle - you will be returned to NORMAL MODE at the
beginning of the next chain cycle.
The changes will be written to memory.
The sequencer will continue to play, and you will hear what you’ve done.
|
Tip
|
You can hold a pattern SLOT button (any) while pressing TAP - this acts as sustain. |
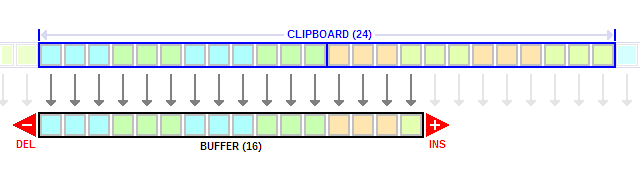
4.5. Pattern Copy/Paste/Swap
|
Note
|
If the sequencer is playing - press STOP to stop it. |
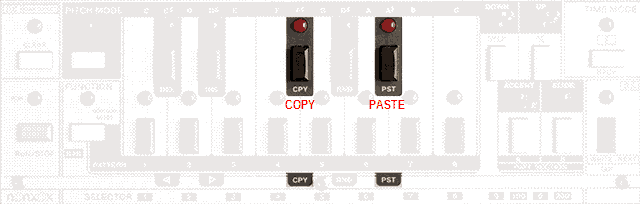
Copy:
Press CPY.
The pattern/chain data from the pattern buffer is copied to the clipboard buffer.
The pattern index of the first pattern is stored too.
|
Tip
|
Some modes in n0nx0x let you modify the patterns without saving them to the memory immediately. You can actually Copy a modified pattern from the pattern buffer into the clipboard, then discard the modification, and Paste the copy afterwards onto a different pattern slot. |
|
Note
|
The clipboard buffer is in RAM. Powering OFF the x0xb0x, or restarting the CPU would erase its contents. |
Paste:
Press PST.
The currently selected pattern/chain will be overwritten with the pattern(s) from the clipboard buffer.
Swap:
Press CPY + PST.
This will swap the actual patterns in memory.
|
Note
|
The actual pattern data from the clipboard is not used here, only the index. |
5. PATTERN-PLAY mode
In this mode, you can select patterns/chains and apply Pitch-Shift.
5.1. Pitch-Shift
The whole pattern/chain can be transposed with up to +12 semitones.
To apply Pitch-Shift:
Hold PITCH MODE.
The Pitch-Shift amount will be displayed on the (Keyboard) LEDs.
Press a Key button.
|
Note
|
Selecting a pattern/chain resets the Pitch-Shift to 0, but changing the PATT. SECTION doesn’t. |
|
Note
|
Switching to PATTERN WRITE mode resets the Pitch-Shift to 0. |
|
Note
|
If the sequencer is playing, the Pitch-Shift will take effect on the next chain cycle. |
|
Tip
|
If you want to change the pattern/chain such that it starts with Pitch-Shift applied immediately - Select it in advance first, then quickly apply the Pitch-Shift. |
5.2. Test tone
In case you want to hear a test-tone in order to tune the x0xb0x to another synth or reference tone - you can do it here.
|
Note
|
If the sequencer is playing - press STOP to stop it. |
Press TAP.
The sequencer will play a high-C note (3 volts CV).
You can now adjust the TUNING control to get ~130.813Hz.
|
Tip
|
The test-tone is affected by the Pitch-Shift setting. Use Pitch-Shift to 'A' if you want to tune to 220Hz. |
Tracks
If you’ve followed the manual, you already know how you can play patterns and chains of patterns
and apply Pitch-Shift to them in PATTERN-PLAY mode.
Here, you can let the sequencer do that for you using tracks.
When a track is played - the sequencer automatically changes the patterns, and applies Pitch-Shift.
- What is a track?
-
A track contains the following data:
-
An array of Bars (64)
-
Length (D.C.)
-
Sign
-
- What’s a Bar?
-
Each Bar contains:
-
Pattern Slot (1 to 8)
-
Pattern Section (A or B)
-
Pitch-Shift
-
A Bar is actually a pattern pointer.
The length of a Bar is the length of the pattern it points to.
Each track uses a fixed pattern bank.
In other words, a track can use the (16) patterns from one bank.
See the table:
TRACK |
1 |
2 |
3 |
4 |
5 |
6 |
7 |
8 |
9 |
10 |
11 |
12 |
13 |
14 |
15 |
16 |
PATT.BANK |
I |
II |
III |
IV |
V |
VI |
VII |
VIII |
||||||||
|
Note
|
This is also shown on the TRACK selector. |
Length:

This is the number of bars of the track.
It can normally range from 1 to 64.
It can be extended up to 256, which simply overwrites the following tracks' bars.
Extended tracks:
The maximum Length of each track is shown in the following table:
TRACK |
1 |
2 |
3 |
4 |
5 |
6 |
7 |
8 |
9 |
10 |
11 |
12 |
13 |
14 |
15 |
16 |
MAX LENGTH |
256 |
256 |
256 |
256 |
256 |
256 |
256 |
256 |
256 |
256 |
256 |
256 |
256 |
192 |
128 |
64 |
In other words, if you extend Track 1 to 80 bars - you should not modify Track 2,
because it’s part of Track 1 now.
Even if you extend Track 13 to 256 bars (which would make it overwrite tracks 14, 15, and 16) - it will still only
use patterns from its own bank (Bank VII in this case).
Sign:

This is a unique pointer which points to a bar within the track.
When playing a track, it’s possible to jump and continue from the bar pointed to by the Sign.
6. TRACK-WRITE mode
The actual track programming is done while the sequencer is running.
|
Important
|
If the sequencer is stopped - press RUN to start it. |
The sequencer will play the pattern from bar 1 repeatedly.
Select some pattern and apply Pitch-Shift if needed. Press WRITE/NEXT.
The selected pattern and pitch-shift will be written to bar 1, and the position will automatically advance to the next bar.
The sequencer will now play the pattern from bar 2 repeatedly.
Repeat this process for each bar of the track.
When you reach the last bar of the track, before you press WRITE/NEXT - set the D.C. marker.
The track is complete!
|
Warning
|
Going past bar 64 will extend the track, which overwrites bars from the following track(s). |
|
Tip
|
You can select whole chains of patterns and write them at once by pressing WRITE/NEXT. This simply writes each pattern to a bar and advances to the next bar. If D.C. was set - the D.C. marker will be placed at the last bar of that chain. |
6.1. Setting the D.C. marker
The D.C. marker has to be written on the last bar.
It sets the Length of the track.
Press the D.C. button.
The (D.C.) LED will blink.
Now press WRITE/NEXT to write the bar.
6.2. Setting the Sign marker
The Sign marker can be written to a bar in the track.
Press the Sign (BACK) button.
The (Sign) LED will blink.
Now press WRITE/NEXT to write the bar.
6.3. What BAR is it?
The sequencer can display bar numbers using the Bar number LED animation.
If you get disoriented, or want to know where the markers are - here’s how:
To check the current position:
Hold BAR.
The current position in the track will be displayed.
To check on which bar the D.C. marker is:
Hold BAR and press D.C.
The bar number will be displayed.
This is equivalent to the track length.
To check on which bar the Sign marker is:
Hold BAR and press the Sign (BACK) button.
The bar number will be displayed.
6.4. Jump to BAR
You can go to a specific bar very quickly by dialing its number.
Hold BAR.
Dial the bar number using the SELECTOR buttons 0 to 9.
Release BAR.
The number you’re dialing will be shown using the Bar number LED animation.
The actual jump will happen after you release the BAR button.
|
Note
|
When you release BAR - if the bar number is invalid, the jump is canceled. If you’re unsure whether the jump operation was successiful - just re-check the bar position by pressing and holding BAR again. |
|
Tip
|
Example 1. You can use the SELECTOR buttons 100 and 200 here.
Press one of them first, and then use the buttons 0 to 9 for the rest. |
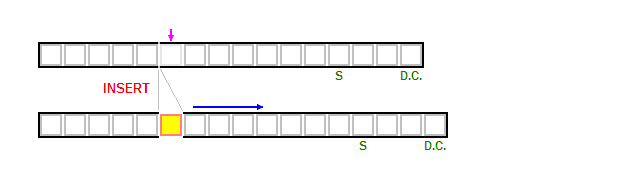
6.5. Delete & Insert BAR
You can delete or insert a bar at the current position.
To delete the bar:
Hold BAR and press DEL.
The current bar will be deleted and all following bars till the end of the track will be shifted back towards the "hole".
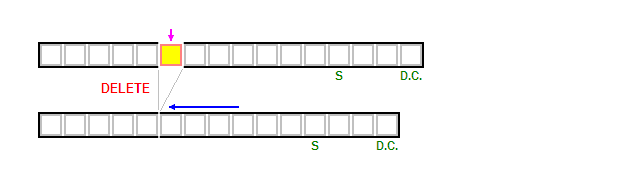
To insert a bar:
Hold BAR and press INS.
The current bar will be duplicated and all following bars till the end of the track will be shifted forward.
7. TRACK-PLAY mode
In this mode, you can play the tracks.
Pattern selection and Pitch-Shift are in control of the sequencer.
First, select the track:
|
Important
|
If the sequencer is playing - press STOP to stop it. |
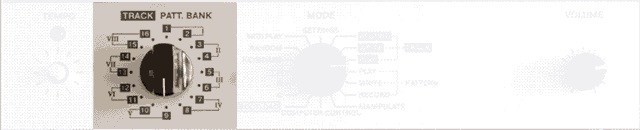
Select the track you want to play using the TRACK selector 1 to 16.
Optionally reset the position to bar 1 (the beginning of the track):
Press BAR RESET.
Play the track:
Press RUN to start the sequencer.
The sequencer will play the track from the current position.
While the track plays you can:
-
Jump to the "Sign" bar by pressing the Sign button
-
Jump to bar 1 by pressing BAR RESET.
This also reloads the track.
When the end of the track is reached:
-
The playing position will be reset to bar 1, and the track will continue from there.
-
If you’ve selected another track (using the TRACK selector), the sequencer will start playing that track.
|
Tip
|
The sequencer can switch to another track if the TRACK selector points to it when the current track ends, or if you’ve forced it by pressing BAR RESET. |
8. TRACK-RECORD mode
This is an alternative to TRACK-WRITE mode.
In TRACK-RECORD mode, you "perform" the track while the sequencer plays, and the information is "recorded" automatically into the bars in realtime.
Prepare to start recording:
First, select the track:
|
Note
|
If the sequencer is playing - press STOP to stop it. |
Select the track using the TRACK selector (1 to 16).
It’s not possible to select the very first pattern/chain during the actual recording, thus you have to select it before that.
Select the very first pattern/chain and apply pitch-shift if needed.
You can start the sequencer in order to to exercise or just to confirm that you’ve selected the right pattern.
Just stop the sequencer when ready to start recording.
When you’re ready:
Press BAR RESET (CLEAR).
The (CLEAR) LED will blink indicating that the sequencer is now awaiting to start recording.
This also resets the position to bar 1 (the beginning of the track).
You can change the starting position if you wish to start from somewhere else by using the Jump to BAR function.
The actual recording will start when the sequencer starts playing (either via the RUN button, or via Delayed-Start, or simply when the Master starts).
You can now proceed to start recording!
Start recording:
Press RUN to start the sequencer.
The sequencer will play starting with the pre-selected pattern/chain.
At the end of each pattern (bar) - the pattern and pitch-shift are written to the track (bar) automatically
(including the markers, if they are set) and the position is advanced.
While recording, you can:
-
Select patterns/chains.
-
Apply pitch-shift.
-
Set the Sign marker to the current bar (by pressing the Sign button).
-
Set the D.C. marker to the current bar to make it last bar of the track (by pressing the D.C. button).
This ends the recording (but the sequencer continues to play). -
Stop the sequencer (by pressing STOP or when the Master stops).
This also ends the recording, but does not change the D.C. marker automatically.
A progress bar (using the (BANK) LEDs) will show the current position in the track against the
maximum possible length of this track (including extending).
If the maximum length of the track is reached - recording stops automatically (but the sequencer continues to play).
|
Warning
|
Going past bar 64 will extend the track, which overwrites bars from the following track(s). |
|
Tip
|
You can check which bar you’re on. |
|
Tip
|
If you make a mistake during the recording - you can fix it in TRACK-WRITE mode afterwards, or restart recording from bar 1 or from a few bars before the mistake. |
9. MANIPULATE mode
In this mode, the currently selected pattern/chain is locked and cannot be changed.
All manipulators operate on the pattern buffer, so the changes can be heard instantly, while nothing is written to EEPROM.
In the main menu, the (WRITE/NEXT) LED blinks when changes have been made,
and WRITE can be pressed to save these changes to EEPROM.
The BACK button is used to discard the changes (reloads the the chain from EEPROM).
If the changes haven’t been saved, and you leave MANIPULATE mode - you can still go to the other modes like PATTERN-PLAY, however, as soon as you change the selection - the changes will be lost (since selecting a chain overwrites the pattern buffer).
|
Tip
|
You can copy the modified chain into the clipboard buffer. |
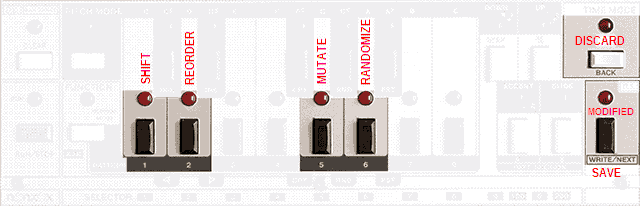
9.1. (SLOT 1) SHIFT
Hold the SLOT 1 button.
-
Use DEL to shift ← left
-
Use INS to shift → right
-
Use TAP to "tap-in" the beginning, which will make the sequencer automatically shift the whole chain so that the step at which you tapped becomes the first one.
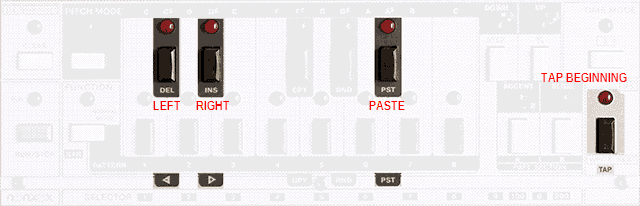
9.1.1. Trim-Shift, Tile-Shift, Resize
While holding SLOT 1 (for SHIFT):
Press the PST button.
The (PST) LED should light up indicating that the Clipboard buffer will be used.
Now shifting ← left or → right will be done with the data from the Clipboard.
If the clipboard contains less steps than the pattern buffer:
If the clipboard contains more steps than the pattern buffer:
If the clipboard contains the same number of steps as the pattern buffer:
3 patterns of (12, 6, 6) steps were copied to the clipboard, then their lengths are changed to (8, 8, 8) and then pasted via the RESIZE trick.
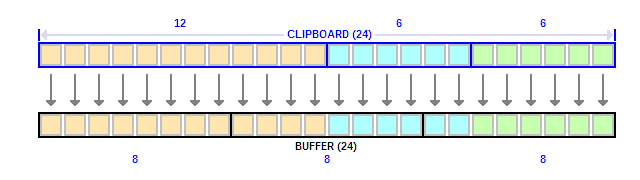
This function is more like a trick that can be used to:
-
Combine multiple small patterns into smaller number of big patterns
-
Split a big pattern into smaller patterns
-
Adjust the sizes of the patterns
First, you have to go to Pattern-Write mode
-
Copy the pattern/chain
-
Change the pattern lengths individually for each pattern (this would mess up the actual patterns, but they were copied).
-
Re-select the pattern/chain which should now contain the same amount of steps (total) but different pattern lengths and/or count.
-
Go to MANIPULATE mode, hold SLOT 1 (for SHIFT) and press PST.
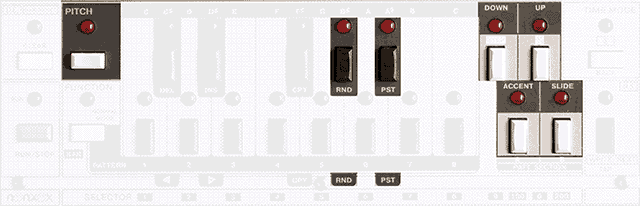
9.2. (SLOT 2) REORDER
Hold the SLOT 2 button.
-
Use RND to reorder everything randomly (small probability is used).
-
Use FUNCTION to reorder in the pitch data only.
-
Use BACK to reverse the chain.
-
To reorder the respective attributes, use:
-
PITCH
-
DOWN
-
UP
-
ACCENT
-
SLIDE
-
9.3. (SLOT 3) TRANSPOSE
Hold the SLOT 3 button.
-
Use DEL / INS to transpose down / up one semitone at a time.
-
Use DOWN / UP to transpose down / up a whole octave.
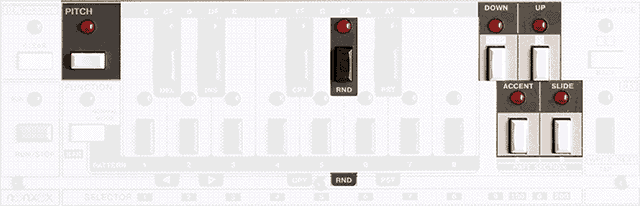
9.4. (SLOT 5) MUTATE
Hold the SLOT 5 button.
-
Use RND to mutate everything.
-
To mutate the respective attributes, use:
-
PITCH
-
DOWN
-
UP
-
ACCENT
-
SLIDE
-
|
Tip
|
You can chose whether the mutation will use random data or data from the Clipboard buffer by pressing PST. |
If the (PST) LED is lit - all mutate operations will use data from the Clipboard.
10. Pattern-Trigger mode (A)
In this mode, you can trigger patterns via MIDI Notes, or from the x0xb0x keyboard!
It’s an alternative way for playing patterns, radically different from the other modes.
Pattern-Trigger mode is similar to how software 303 plugins map patterns to MIDI Notes,
and pressing down notes makes the sequencer play the corresponding pattern.
Overlapping notes switches between patterns instantly without restarting the step position within the pattern,
making it possible to make variations in realtime very easily.
In n0nx0x2, Pattern-Trigger mode maps 16 patterns slots (1 whole Bank) to 16 subsequent MIDI Notes,
as well as 13 pitch-shift keys to another 13 subsequent MIDI Notes.
n0nx0x2 will listen for MIDI Notes on the MIDI Input Channel (the same channel used for MIDI-Play mode).
This mode requires some source of MIDI Notes (MIDI Keyboard/Controller with at least 2 octaves, or a DAW),
and makes sense only in Slave mode (you need to use external clock - MIDISync or DinSync).
…or does it? TODO
10.1. Mapping
|
Note
|
The offsets are stored in the internal EEPROM just like all the settings, however, configuring the offsets is not done in SETTINGS mode, but here instead. |
To set the offset to the pattern slots:
-
Make sure the sequencer is not playing.
-
Hold FUNCTION and press DEL.
Now n0nx0x2 expects you to press the MIDI Note which will correspond to the first pattern slot.
-
Press the desired MIDI Note (e.g. C2).
To set the offset to the pitch-shift keys:
-
Make sure the sequencer is not playing.
-
Hold FUNCTION and press INS.
Now n0nx0x2 expects you to press the MIDI Note which will correspond to the first pitch-shift key.
-
Press the desired MIDI Note (e.g. C4).
|
Note
|
The two offsets settings will be saved to EEPROM when you switch to another mode. |
11. FLAT-Edit mode (B)
In this mode, you can edit patterns/chains while the sequencer is running, and the patterns are in "FLAT" format.
- What is this "FLAT" format?
-
In Pattern-Write mode, the patterns are represented to you the same way as on the 303 - via PITCH MODE and TIME MODE, thus you have the 303 pattern format abstraction, Gate/Tie/Rest and a list of pitches.
"FLAT" format lacks that, and the patterns here are represented to you in the form of an array of steps with only Gate/Rest, where each Gate has pitch information which doesn’t "move".
This is common for most of the early 303 clone sequencers, including the actual stock firmware for the x0xb0x.
|
Note
|
In B mode, the pattern/chain selection is locked. |
While the sequencer plays:
-
Use the PITCH MODE button to switch between Gate/Rest (the pitch value is lost when you set Rest).
-
Use the Keyboard buttons to set the pitch (only for steps with Gate).
-
Use the DUAS buttons to toggle the Down/Up/Accent/Slide attributes.
-
Use NEXT / BACK to step through the pattern.
The step position, relative to the beginning of each pattern is shown on the (BANK) LEDs, as well as the slot index relative to the chain (half-lit). -
Use FUNCTION + TAP to jump to the currently played step.
|
Note
|
The changes you make to the patterns are not saved to memory here. |
While the sequencer is stopped:
If the patterns are modified - the (WRITE) LED will blink.
The selected pattern/chain is shown as normal but cannot be changed.
-
Press WRITE to save the changes to memory.
-
Press BACK to discard the changes.
-
Hold PITCH MODE to apply Pitch-Shift.
12. MIDIPLAY mode
In this mode, you can sequence the x0xb0x from an external sequencer or keyboard, via MIDI notes.
The internal sequencer is off.
Clock Sync generation/conversion keeps working.
Up to 8 simultaneously held notes will be tracked.
After the first held note - additional notes will be played with Slide (legato style).
Velocity below 100 will result in "normal" notes, while velocity of 100 or higher - Accented notes.
The (BANK) LEDs will indicate the number of held notes in the Monophonic Voice Allocator (MVA).
13. Computer Control mode
There isn’t much in this mode.
It is commonly confused that you must be in this mode in order for the x0xb0x to communicate with the control app.
The x0xb0x firmware generally accepts serial commands no matter what mode it’s in.
However, a few special little n0nx0x functions are accessible here…
13.1. Half-lit LED brightness
Since v2.09, n0nx0x has a new LED state - "half-lit".
It actually blinks very quickly and gives the impression that it’s lit at a lower brightness.
To adjust the brightness:
Hold SLOT 1.
Press DEL / INS to decrease / increase the brightness.
The setting will be saved to the internal eeprom when you exit Computer Control mode.
13.2. Fancy LED animation
This is a silly feature, it has no real purpose, except to look nice ;]
To start it:
Press CLEAR.
|
Tip
|
Additionally, you can make the animation faster or slower by pressing DEL / INS. |
14. Special features
14.1. Delayed-Start & Delayed-Restart
n0nx0x2 has dedicated counters to keep track of the Master clock.
These counters are only reset when the Master Starts playing.
The Master Counter "wraps" after a configurable number of steps (1 to 32).

|
Note
|
Delayed-Start and Delayed-Restart are available in the following modes:
|
|
Tip
|
This functionality also works when the x0xb0x itself is in Master (Internal Sync) mode,
the Master Counter simply wraps when the x0xb0x is started from the RUN/STOP button. Starting it via Delayed-Start doesn’t reset the Master Counters. |
14.2. Bypass Master Start/Stop
When the x0xb0x is slaved, this feature lets you Start or Stop the Master without the x0xb0x reacting to it.
The Master Start isn’t completely ignored - the master counters will always be reset,
thus you can use the Delayed-Start & Delayed-Restart functions to "join" the x0xb0x afterwards.
From the main menu - hold FUNCTION.
The (TEMPO) LED blinks in a slightly different way while you hold the FUNCTION button.
Master Start/Stop is now being bypassed.
|
Note
|
This feature is available in all situations where Delayed-Start & Delayed-Restart are available, but only makes sense in Slave sync mode. |
14.3. Shuffle
Since v2.09, n0nx0x has shuffle.
It is adjusted globaly (it’s not a per-pattern attribute).
Since v2.10, there are two kinds of shuffle: the classic "tick-based" shuffle and shuffled-clock (in v2.10).
Tick-based Shuffle:
-
the shuffle only affects the note-gate-out (XSync) but not any of the other sync outputs
-
works in all Sync modes
-
works transparently (no other devices in the chain are affected or aware of it)
-
is reset on the beginning of each pattern (this affects patterns of odd lengths)
-
does not affect patterns with step-mode 3/4
Shuffled-Clock:
-
the shuffle affects all sync outputs
-
works only when the x0xb0x is Master (and it then generates a shuffled clock)
-
affects all slave devices even if they don’t have shuffle capabilities, since the whole clock is shuffled
-
is only reset on Master-Start
-
affects patterns with any step-mode
-
is a bit problematic in some setups (see the additional information below)
14.3.1. Shuffle level
To adjust the shuffle level:
Hold the 3/4 button and hold the TEMPO button (you can then release 3/4).
Adjust the level using the TEMPO encoder.
Release the TEMPO button when done.
The (BANK) LEDs 1 and 16 will be lit when the shuffle level is 0 (neutral).
If the shuffle is positive, LEDs above 1 will be half-lit (LED 7 means shuffle level +6).
If the shuffle is negative, LEDs below 16 will be half-lit (LED 10 means shuffle level -6).
|
Note
|
The shuffle level adjustment is available in the following modes:
|
This shows the possible levels (with tick-based shuffle):
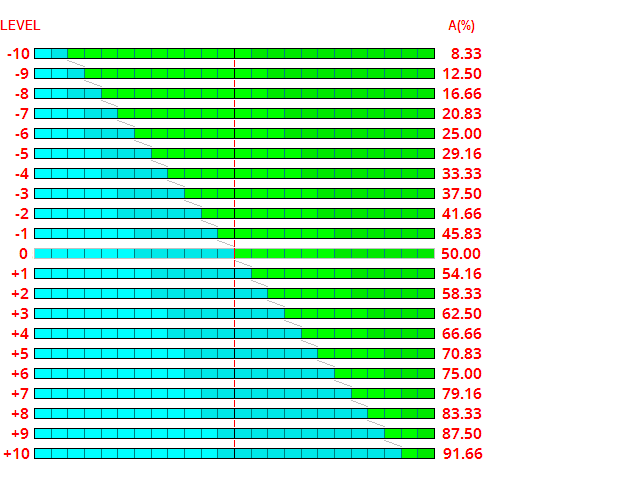 Every first out of two 16th steps are shown in cyan, every second - green.
The percentage is of every first step.
The slightly brighter color shows where the notes (gates) will be held high during non-slid/non-tied notes.
The +6 level matches the maximum shuffle on some classic drum machines.
For reference, if the DinSync doesn’t have 50% pulse-width, but fixed-width, the result might look more like this:
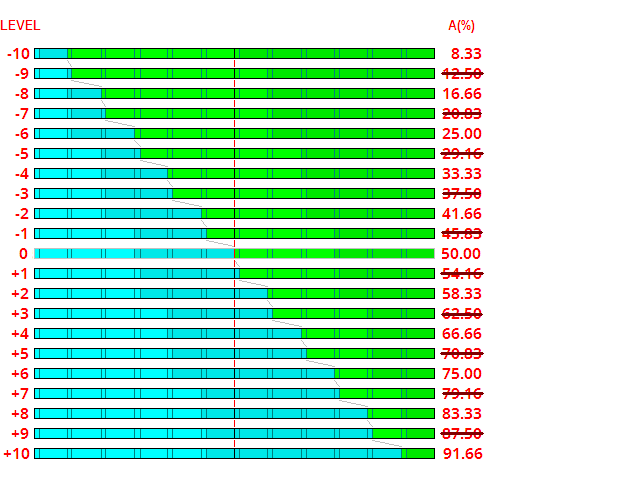 In this illustration every second clock tick (the falling edge) is placed right after the first clock tick
(the rising edge) with some fixed, short delay.
In this illustration every second clock tick (the falling edge) is placed right after the first clock tick
(the rising edge) with some fixed, short delay.
Since the clock ticks are no longer equally spaced - half of the shuffle levels don’t make sense.
Shuffled-Clock:
When using Shuffled-clock, the shuffle levels are slightly different.
The positions of the ticks are also squeezed/stretched in time.
The min/max shuffle levels in this case are equivalent to +/- 6 in the tick-based shuffle (25% to 75%).
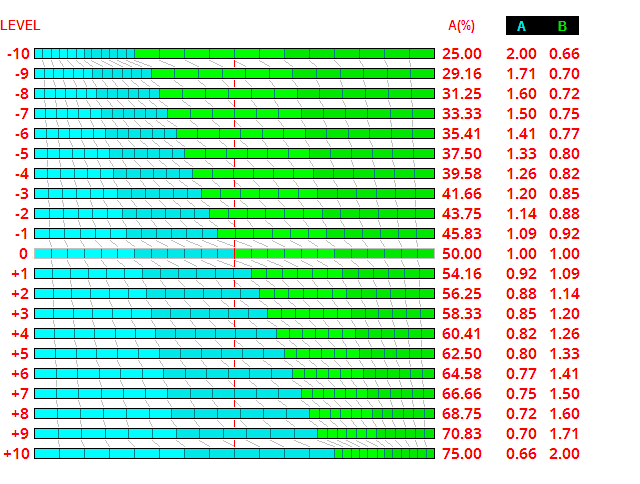 In the illustration above, the A and B coefficients are used to calculate the resulting tempo.
For example, if the tempo is set to 120BPM,
and shuffled-clock level of +7 is applied - the internal clock will alternate between 120*0.75 and (120*1.5) thus 90BPM and 180BPM.
Additional information:
Tick-based Shuffle:
The tick-based shuffle in n0nx0x2 works by counting clock ticks, and relies heavily on 48 evenly-spaced ticks per beat,
to give a rich amount of levels.
It works ideally in Internal Sync mode (since the x0x generates its own dinsync clock).
It would also work in DinSync mode, if the source clock has 50% pulse-width.
It would work in MIDISync mode with the Prediction method.
In any case where the clock doesn’t have proper 50% pulse-width, or in other words if the 48 clock ticks aren’t equally spaced in time - some (or most) shuffle levels will not make sense.
Shuffled-Clock:
The Shuffled-Clock works only in Internal Sync (Master) mode,
while for the Slave modes - the shuffle is switched to tick-based automatically.
It works by alternating the clock frequency between a slightly slower and slightly faster tempo on each step,
where the effective overall tempo is still the same as the desired tempo.
When slaving other devices to shuffled clock, you should have the following things in mind:
-
If the device runs on DinSync - use DinSync, otherwise use MIDISync (or XSync).
-
Avoid converting the lower resolution clocks (MIDISync and XSync) to higher resolution clocks using converters, because this could be problematic and may fail.
-
If the device internally generates a higher resolution clock than the clock it accepts - the result could be bad.
As an example, if you slave another n0nx0x2 to the shuffled-clock via MIDISync - the converted DinSync would fail in some situations (when using the prediction method, or too long pulse-width with the fixed-width method). -
With the max BPM (300) and max shuffle level, the tempo goes as high as 600BPM.
This could be a problem to some devices which don’t poll fast enough (including older versions of n0nx0x).
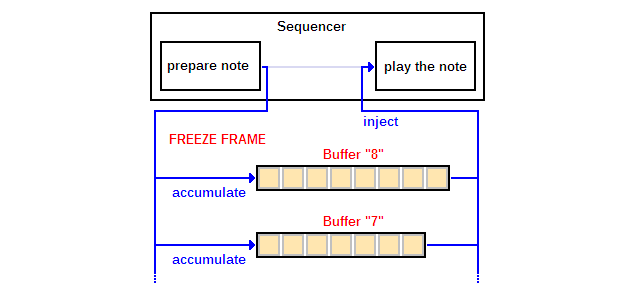
14.4. Freeze Frame
Freeze Frame is a performance-oriented feature.
It works similarly to a buffer-override or stutter loop effect.
It does not modify the patterns/tracks in any way, it only changes what is being played by the sequencer in a surgically clean way.
|
Note
|
Freeze Frame is available in the following modes:
|
To access the Freeze Frame micro menu:
Hold STEP.
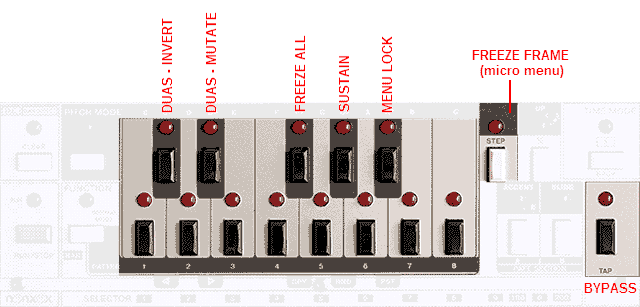
From within the menu, holding down a SLOT button activates the respective Freeze Frame buffer.
When activated - that buffer stops accumulating new notes, and starts injecting its contents instead.
Multiple slot buttons can be pressed, but only one of the buffers may inject notes (the newest one).
14.4.1. Menu lock
You can press the MENU LOCK button (A#) if you want to stay in the Freeze Frame menu without holding the STEP button.
To get out of the menu - press STEP.
14.4.2. Sustain
Sustain mode can be toggled with the SUSTAIN (G#) button.
When Sustain mode is enabled - the activated Freeze Frame buffer will remain active even when the slot button is no longer pressed.
The sustain will remain untill you switch it off (using the SUSTAIN button).
-
the sequencer stops playing
-
the Track reaches its end, and wraps around (in TRACK-PLAY mode)
-
you use any of the following features: Jump to BAR, BAR RESET, D.S. (in TRACK-PLAY mode)
14.4.3. Freeze All
When "Freeze All" mode is enabled - activating even one of the buffers makes all other buffers stop accumulating new notes too.
14.4.4. DUAS - Invert & Mutate
When enabled, INVERT inverts the DUAS attributes of the injected notes. MUTATE is a variation of INVERT but modifies the DUAS attributes in the actual buffers.
INVERT and MUTATE are "momentary" modifiers.
|
Tip
|
If you want to enable one of them without holding the respective button - go out of the Freeze Frame menu (by releasing STEP) while its button is held, then go back to the Freeze Frame menu - the modifier is still enabled. |
14.4.5. Micro Sustain
This is a technique for sustaining the activated Freeze Frame buffer quickly.
The trick is to go out of the Freeze Frame menu (by releasing STEP) while the SLOT button is held down.
This is a more "fragile" variant of sustain.
-
the sequencer stops playing
-
you select patterns (or press the pattern SLOT buttons in TRACK-PLAY mode)
-
you press and release a SLOT button from the Freeze Frame menu again
EOF