x0xlarge/Vx
|
Note
|
2020 update: There’s a Refreshed design of the x0xlarge |
The Story
Some time around the year 2010, in the x0x forums,
a few people made an adapter-board with a much bigger CPU (atmega2561) than the original (atmega162).
It’s a small board with the new CPU on it, and 40 header pins which plugs right into the atmega162 socket on the x0xb0x.
Some time later, guest modified the stock firmware to work on this bigger CPU,
and also adapted a stk500v2-based bootloader for it.

This "Vx" cpumod didn’t quite get into the hands of many people, i think only about 10 were ever made.
After i got myself one of these (after so much waiting) i began modifying the firmware as i wanted (the n0nx0x2 project).
The starting point for all of this was the source files which guest left:
-
The adapted stock firmware v1.05 (aka x0xb0x2.hex)
-
The adapted stk500v2 bootloader (aka x0xb00t2)
x0xLARGE
x0xlarge is here!

Finally there is a new and obtainable CPUMOD:
It’s redesigned, yet still compatible with the first one (the firmware will work identically).
This one has a different board shape, optimized to not collide with the tall electrolytic caps to the left of the IC slot,
so less effort to "install" it (just 2 polyester caps will have to be bent down a bit).
It will be pre-flashed with the x0xb00t2.1 bootloader (see below) and fuses and lock bits correctly set and locked
so that it’s impossible to easily corrupt the bootloader afterwards.
This cpumod has ISP in addition to the rather expensive JTAG.
So if you want to hack it - just solder a 2x5 pin header on the ISP location of the board,
unplug from the x0x, plug the programmer - and you’re h4xin' ;]
Installation
First, unplug your original cpu from the socket.
|
Important
|
If it requires a lot of force to plug the cpumod in the socket, or you hear crackling sounds - stop. Widen the socket holes with something. [b]The cpumod should plug-in smoothly, don’t crack your x0xb0x and/or the cpumod! |
There will be two polyester capacitors right under the cpumod that are normally sticking out and are too tall - bend them down a bit.
Here’s a great video demonstrating the process:
Alternative Installation (for more exotic x0xb0xes):
The normal installation method should work for normal x0xes, that is,
standard ones with the standard PacTec enclosure, or any other enclosure that is not smaller than the pactec.
However, there are other x0x variants like the x0xi0, where the mainboard is altered.
In those cases, the alternative installation would require some DIY.
The idea is to connect the cpumod as a "tumor" using flatcables from the cpumod board with 40 pins on the other end.
Thus plug those 40 pins into the cpu socket, and put the cpumod wrapped in a bag or something,
so it doesn’t touch the x0x internals.
The x0xLARGE cpumod has a bunch of holes which can be used to screw the board onto something else,
or you could even use them to tie the "tumor" so it doesn’t bounce around inside.
… That’s really up to your DIY imagination ;]
What’s the reason for the cpumod?
You may wonder..
The x0xb0x originally uses the atmega162 cpu, which isn’t very big in terms of flash memory.
The most famous x0x firmware for the atmega162 - SokkOS, has already reached the 15.5kB limit,
and from there - new features cannot be added unless something else is removed or optimized to death.
This makes it a pain for the firmware developers.
Also, the x0x bootloader on the atmega162 had to fit into barely 0.5kB and thus it’s very primitive.
It has simple 1-byte commands, no visual indication of any sort, so sometimes it’s hard to determine if it works or not.
The atmega2561 has 256kB of flash space, that’s 16 times the old one.
It also has more I/O pins which can be used for extra modification.
The cpumod board re-routes the pins from the new cpu to the old cpu,
and leads out the extra I/O nicely on the board, ready for modification.
The cpumod uses the existing EEPROM from the x0x mainboard, but also has internal 4kB eeprom,
and a socket for another external EEPROM.
Now there is no more pain when developing for this cpu!
The bootloader sits on 8kB of space and runs at a faster baudrate.
It uses a more complex protocol (stk500v2),
which was further enhanced (x0xb00t2.1) with visual indication (LED indication and progress bar),
and was also equipped with MIDI-SYSEX.
Technical Details
x0xb00t2 - The Bootloader
The biggest difference with the old (162) bootloader is that this one uses 57600 baudrate and a less-primitive protocol.
This cpumod is set to take the maximum size possible for a bootloader (on the atmega2561): 8kB (nice, eh?).
guest has adapted it to work like the old bootloader: on boot, it reads the MODE selector value,
and if it points to "BOOTLOAD" - the bootloader remains running, otherwise it jumps to the firmware.
The stk500v2 protocol uses messages encoded into fancy packets with checksums,
so it’s more safe (think of what happens if the user is accidentally sending random data to the serial port,
this could easily erase the firmware with the old bootloader).
Thus, the c0ntr0l app and c0nb0x won’t work with this bootloader at all, instead,
avrdude has to be used (or anything which can program an stk500v2 bootloader).
I’ve further modified the bootloader:
-
removed some big functions that took about 5kB of code space and probably no one would ever use
-
added a special LED pattern that makes it obvious whether you’re in "BOOTLOAD" mode or not (since otherwise the LEDs boot up in random states)
-
added some sort of a progress-bar LED animation for when programming Firmware hex via the bootloader
-
NEW: x0xb00t2.1 - added Firmware update via MIDI SYSEX
x0xb00t2.1
x0xb00t2.1 is now 3978 bytes
| x0xb00t2.1 source |
x0xb00t2.1.zip (40 KB) |
Firmware update via USB
|
Note
|
The USB on the x0xb0x is actually a USB-to-Serial interface. It appears to the computer as a Virtual Serial Port. |
Open a terminal/command prompt.
"cd" into the directory where you got the firmware hex file:
cd ~/Downloads/…and use the following command:
avrdude -p atmega2561 -c stk500v2 -P PORT -b 57600 -e -U flash:w:FW.HEX:ihex-
Replace the PORT with the name of the virtual serial port (e.g.
COM3,/dev/ttyUSB0) -
Replace the FW.HEX with the actual file name
|
Tip
|
You can specify the full filepath to the firmware.hex, you might need to wrap it in double quotes if it contains spaces. |
|
Tip
|
Invoke “avrdude -?” for a full list of arguments and usage. |
Firmware update via MIDI-SYSEX
|
Note
|
You’ll need to have a MIDI Interface, and a MIDI cable. |
The firmware.hex must be converted to sysex data (.syx file) with as_hex2syx:
| Source code |
as_hex2syx_src.zip (source code and Code::Blocks project) |
as_hex2syx.exe
|
as_hex2syx.exe (win32 binary) |
This is a small command-line tool. It should be buildable on other platforms (it uses std cout/fstream and such).
To use the tool: call it from a command prompt or terminal and pass the .hex file as an argument.
To actually send the resultant .syx file to the x0xb0x - you need a MIDI-Librarian app,
i’ve tried with MIDI-OX and Elektron C6.
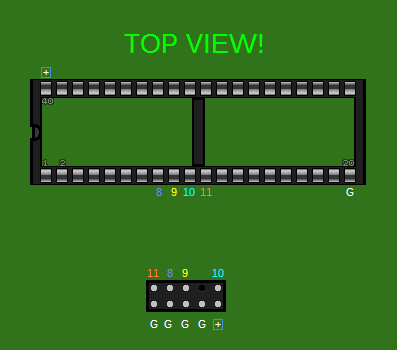
10-pin ISP adapter
|
Note
|
This is not needed for the x0xLARGE cpumod since it has an ISP port already, unlike the Vx. |
There’s already information for how to connect a 6-pin ISP to
the cpumod - at guest’s site.
I am using a 10-pin ISP programmer, so i made myself a crude adapter:

Last updated: 2014-01-08